Saturday, March 1, 2025
How to Repair a Battery for Solar Power Storage Systems
Repairing Batteries for Solar Power Storage Systems
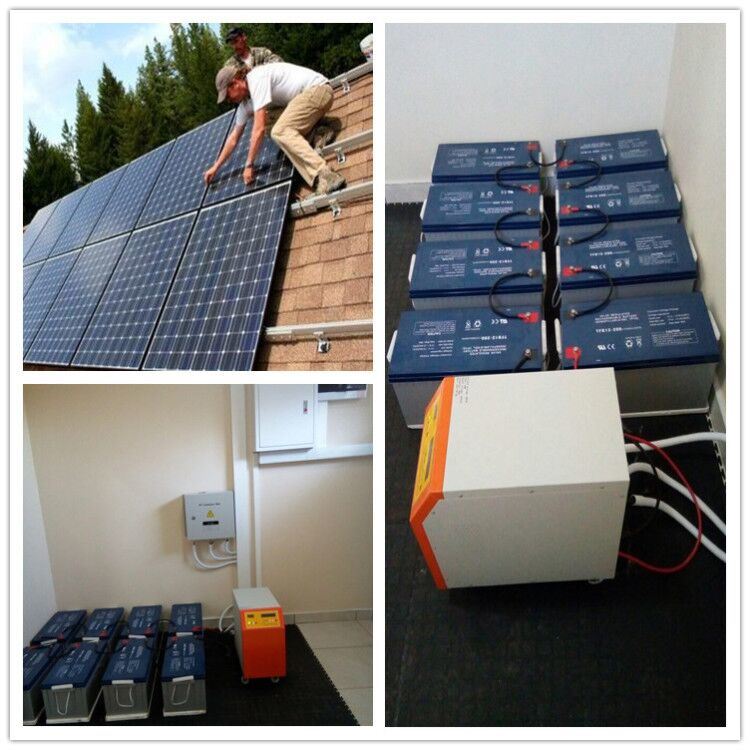
Solar power storage systems rely heavily on batteries to store excess energy generated during the day for use at night or during periods of low sunlight. Maintaining the health and longevity of these batteries is crucial for ensuring the efficient and reliable operation of the entire system. While battery replacement is often the preferred solution, understanding the repair process can be beneficial in certain situations, especially for extending the lifespan of older batteries.
This article will delve into the complexities of repairing batteries for solar power storage systems, discussing various techniques, considerations, and limitations. It aims to provide homeowners and system owners with a comprehensive understanding of the process, empowering them to make informed decisions regarding their battery maintenance and repair.
Understanding Battery Types and Their Repair Limitations
Before exploring repair techniques, it's essential to differentiate between various battery types commonly used in solar power storage systems:
Lead-Acid Batteries
Lead-acid batteries, the most traditional type, are still widely employed due to their affordability and availability. They consist of lead plates immersed in an electrolyte solution. Repairing lead-acid batteries often involves addressing issues like:
- Sulfation: Lead sulfate buildup on the plates reduces battery capacity and performance. Desulfation techniques can sometimes revive sulfated batteries.
- Corrosion: Corrosion on the terminals or plates can hinder electrical conductivity. Cleaning and replacement of corroded parts may be necessary.
- Low Electrolyte Level: Topping off the electrolyte with distilled water is crucial for maintaining proper battery function.
However, the repair potential of lead-acid batteries is limited. Deep discharge, excessive aging, and physical damage can permanently impair their performance.
Lithium-Ion Batteries
Lithium-ion batteries, known for their high energy density and longer lifespan, are increasingly gaining popularity in solar storage systems. These batteries offer a greater range of repair options, including:
- Cell Balancing: Individual cells within a lithium-ion battery pack can experience uneven charge levels. Balancing circuits within the battery management system (BMS) help to distribute charge evenly, prolonging battery life.
- BMS Reset: In some cases, resetting the BMS can address communication errors or software glitches that may be affecting battery performance.
- Cell Replacement: If a specific cell within the battery pack fails, it can sometimes be replaced with a new one. However, this requires specialized tools and knowledge.
It's crucial to note that lithium-ion battery repair is a complex process requiring specialized equipment and expertise. Attempting repairs without proper knowledge can lead to further damage and potential safety hazards.
Repair Techniques and Considerations
Desulfation for Lead-Acid Batteries
Desulfation involves removing lead sulfate buildup from the battery plates. This can be achieved through various methods:
- Pulse Charging: Applying a series of high-amplitude pulses to the battery can help break down sulfate crystals.
- Equalization Charging: Charging the battery at a higher voltage for an extended period can facilitate desulfation.
- Battery Desulfators: Specialized devices designed for desulfation can be used to apply controlled pulses or other methods.
Desulfation can be a challenging process and may not always yield successful results. It's essential to consult with a battery specialist to determine if desulfation is appropriate for your specific battery.
Cleaning and Corrosion Removal
Cleaning the terminals and plates of lead-acid batteries is essential to maintain good electrical conductivity. Use a wire brush and baking soda solution to remove corrosion. Ensure that the battery terminals are securely connected and free of any corrosion.
Battery Replacement
In cases of significant damage or age-related decline, replacing the battery may be the most cost-effective solution. Consider factors like battery capacity, chemistry, and warranty when choosing a replacement.
Safety Precautions During Battery Repair
Battery repair can involve working with potentially hazardous materials and high voltages. Always prioritize safety by adhering to these precautions:
- Wear protective gear: Use gloves, safety glasses, and protective clothing to prevent acid burns or electrical shocks.
- Work in a well-ventilated area: Battery charging and desulfation processes can release harmful fumes. Ensure adequate ventilation to prevent inhaling these gases.
- Disconnect the battery: Always disconnect the battery from the solar system before performing any repairs.
- Avoid contact with electrolyte: Lead-acid battery electrolyte is highly corrosive. Avoid direct contact and wear appropriate protection.
- Follow manufacturer instructions: Always consult the battery manufacturer's instructions for specific repair recommendations and safety guidelines.
Professional Battery Repair
If you're unsure about how to repair your solar batteries or if the repair process seems too complex, it's best to consult with a qualified battery specialist or a solar installer. They possess the necessary expertise, tools, and equipment to safely and effectively diagnose and repair your battery system.
Battery Maintenance Tips for Increased Lifespan
Regular maintenance can significantly extend the lifespan of your solar storage batteries. Implement these preventive measures:
- Monitor battery voltage and charge levels: Regularly check battery voltage and charge levels using a multimeter or the system's monitoring system. Early detection of issues can prevent further damage.
- Keep the battery terminals clean: Regularly inspect and clean the battery terminals to prevent corrosion and ensure good electrical connections.
- Avoid deep discharges: Excessive deep discharges can damage the battery and reduce its lifespan. Set the battery's charge level to maintain sufficient reserve capacity.
- Maintain proper battery temperature: Excessive heat or cold can negatively impact battery performance. Ensure the battery is installed in a well-ventilated and temperature-controlled environment.
Conclusion
Repairing batteries for solar power storage systems can be a complex process, requiring a thorough understanding of battery types, repair techniques, and safety precautions. While some basic repairs can be performed by homeowners, it's essential to seek professional assistance for complex issues or if you lack the necessary knowledge and expertise. Regular maintenance and proper battery care can significantly extend the lifespan of your solar storage batteries, ensuring the reliable and efficient operation of your entire system.
How to Revive Old Batteries and Make Them Last Longer
Reviving Old Batteries and Extending Their Lifespan
In today's technology-driven world, batteries power our devices and keep us connected. However, the inevitable truth is that batteries degrade over time, losing their capacity and eventually becoming unusable. While replacing old batteries is often the most practical solution, there are methods to revive aging batteries and extend their lifespan. This article delves into techniques for revitalizing old batteries and provides practical advice for prolonging their life.
Understanding Battery Degradation
Before exploring methods for battery revival, it's crucial to grasp the underlying causes of battery degradation. Batteries lose their ability to store and release energy due to various factors, including:
Chemical Reactions and Internal Resistance
Batteries operate through chemical reactions that involve the movement of ions. Over time, these reactions generate byproducts that build up inside the battery, increasing internal resistance. This resistance hinders the flow of current, leading to reduced capacity and performance.
Electrolyte Depletion and Crystallization
The electrolyte, a fluid that facilitates ion movement, can gradually evaporate or crystallize, hindering the battery's ability to conduct electricity. This process is accelerated by high temperatures and excessive charging or discharging cycles.
Physical Wear and Tear
Repeated charging and discharging cycles, as well as physical impacts or mishandling, can cause wear and tear on the battery's internal components, reducing its overall lifespan.
Reviving Old Batteries
While battery degradation is an inevitable process, there are techniques to revive old batteries and extend their lifespan, though it's important to note that these methods may not work for all types of batteries, and success is not guaranteed.
Deep Discharge and Recharge
This technique involves completely discharging the battery and then fully recharging it. The idea is to break down any buildup of internal resistance and refresh the electrolyte. To perform a deep discharge, fully drain the battery by using the device until it shuts down. Then, recharge the battery fully using a compatible charger.
Using a Battery Reviver
Battery revivers are specialized devices that apply a controlled electrical pulse to the battery. These pulses can potentially break down internal resistance and stimulate the electrolyte. Choose a battery reviver that is compatible with the type of battery you are trying to revive.
Storing Batteries Properly
Proper storage can prevent battery degradation and extend their lifespan. Store batteries in a cool, dry place, away from direct sunlight and heat sources. If you are storing batteries for an extended period, consider keeping them in a partially charged state, as fully charged or fully discharged batteries can deteriorate faster.
Extending Battery Lifespan
In addition to revival techniques, adopting good practices can significantly extend the life of your batteries. Here are some tips:
Avoid Extreme Temperatures
Both extreme heat and cold can damage batteries. Keep your devices and batteries away from direct sunlight, heaters, and other heat sources. When using devices in cold environments, consider using battery warmers or allowing batteries to warm up to room temperature before using them.
Optimize Charging Practices
Avoid fully draining batteries before charging them. It's generally recommended to charge batteries when they reach around 20% capacity. Additionally, avoid leaving batteries connected to a charger for extended periods after they are fully charged. This practice can lead to overcharging and damage the battery.
Use a High-Quality Charger
Employing a reputable and compatible charger is crucial for battery health. Using a substandard charger can lead to improper voltage or current delivery, potentially damaging the battery.
Calibrate Batteries Regularly
Calibration involves fully discharging and then recharging the battery. This process helps to reset the battery's internal charge gauge, ensuring accurate readings and potentially extending its lifespan.
Reduce Battery Usage When Possible
Conserving battery power by using low-power settings, dimming the screen brightness, or closing unnecessary applications can significantly extend battery life. Consider utilizing features like airplane mode when not actively using data services.
Types of Batteries and Revival Methods
Revival techniques vary depending on the type of battery. Here are some common types and their specific considerations:
Lead-Acid Batteries
These batteries, commonly used in cars, are relatively easy to revive. Deep discharging and recharging, as well as using a battery reviver, can be effective. However, avoid overcharging lead-acid batteries, as it can cause damage.
Lithium-Ion Batteries
These batteries power most modern devices, such as smartphones, laptops, and electric vehicles. While some lithium-ion batteries can be revived using deep discharge and recharge cycles, it's important to note that these batteries are more sensitive to overcharging and overdischarging. Therefore, it's crucial to use compatible chargers and avoid excessive discharge cycles.
Nickel-Cadmium (NiCd) Batteries
NiCd batteries are known for their durability and ability to withstand deep discharges. They can be revived using deep discharge and recharge cycles, but it's important to note that these batteries have a tendency to develop a "memory effect" if not fully discharged regularly.
Nickel-Metal Hydride (NiMH) Batteries
NiMH batteries offer higher energy density than NiCd batteries. Like NiCd batteries, they can benefit from deep discharge and recharge cycles. However, they are also susceptible to memory effect.
Conclusion
Reviving old batteries and extending their lifespan can save you money and reduce electronic waste. While these methods may not always be successful, they can offer a second life to aging batteries, especially for devices with limited usage or if you're simply looking for a temporary fix. By understanding the principles of battery degradation, adopting proper charging and storage practices, and exploring appropriate revival techniques, you can prolong the life of your batteries and keep your devices powered for longer.
How to Recondition Your Phone Battery for Longer Use

Give Your Phone Battery a Second Life: Reconditioning for Longer Use
Hey there, tech-savvy friend! Ever feel like your phone battery just isn't cutting it anymore? You know the feeling – you're constantly staring at the dreaded low battery icon, desperately searching for a charger. Well, don't despair! It's possible to breathe new life into your aging phone battery, and I'm here to guide you through the process.
Think of it like giving your car a tune-up. Just like a car engine, your phone battery can lose its pep over time. But with a little TLC, you can bring it back to its former glory and extend its lifespan. This isn't about magic tricks or crazy hacks, it's about understanding how your battery works and giving it the care it needs.
Understanding Your Battery: The Lithium-ion Life Cycle
First things first, let's talk about the basics. Most modern smartphones run on lithium-ion batteries. These batteries are amazing – they're lightweight, powerful, and hold a charge for a decent amount of time. But they have a limited lifespan, like everything else.
Here's the thing about lithium-ion batteries: they wear down with each charge cycle. A charge cycle is one complete drain and recharge of the battery. It's not a single charge, but rather the full cycle that affects the battery. Think of it like a car's odometer; every time you use the battery, it "drives" a little closer to the end of its life.
Now, you might be thinking, "That's depressing!" But don't worry, there's hope. Just like you wouldn't drive your car at full throttle all the time, you can take steps to minimize the wear and tear on your phone battery.
The Art of Battery Reconditioning: A Practical Guide
Okay, let's get into the nitty-gritty of how to recondition your battery. Here's a roadmap for giving your phone battery a fresh start:
Step 1: Deep Discharge and Recharge
This step is all about "re-educating" the battery to work at its full potential. It's a bit like waking up a sleeping giant.
- Fully drain your battery. Let it run all the way down until your phone shuts off completely.
- Leave it disconnected for a few hours. This step allows the battery to rest and reset its internal state.
- Plug it in and charge it all the way up. Ensure you're using the original charger or a compatible one for optimal results.
This deep discharge and recharge cycle can help to recalibrate the battery's internal components and improve its overall performance.
Step 2: Avoid Extreme Temperatures
Just like you wouldn't want to leave your car in the scorching sun or freezing cold, your phone battery doesn't like extremes either. Heat and cold are the enemies of lithium-ion batteries.
- Avoid leaving your phone in direct sunlight. That sizzling dashboard in your car can be a battery killer.
- Keep your phone away from heat sources like radiators or heaters.
- Protect your phone from extreme cold. Don't leave it in your car on a frigid winter day.
A phone battery's ideal operating temperature is between 0°C (32°F) and 35°C (95°F). Keep it within this range whenever possible.
Step 3: Optimize Charging Habits
Let's face it, we're all guilty of charging our phones whenever we get a chance. But it's actually better for the battery to avoid constantly topping it off.
- Avoid charging to 100%. It's best to aim for around 80% and disconnect it. Keeping your phone plugged in for long periods at 100% can stress the battery.
- Avoid letting your battery drain completely. Try not to let it get below 20% before plugging it in.
- Use a good quality charger. Avoid using cheap, generic chargers, as they can damage the battery.
- Turn off unnecessary features like Bluetooth, Wi-Fi, and GPS when not in use. These features consume power and drain the battery faster.
By adopting these charging habits, you'll be giving your battery a more gentle and longer life.
Step 4: Consider Battery Calibration
Here's a more advanced step that can be helpful, but it's not as common as the other steps. Some apps claim to calibrate your phone battery. This process essentially re-trains the battery to report its charge level accurately.
While battery calibration apps are out there, their effectiveness is debated. Some users claim they see improvements, while others say they don't. It's worth trying if you're desperate to squeeze more life out of your battery. Just do your research and choose a reputable app.
When Reconditioning Isn't Enough: Time for a Battery Swap
Okay, let's face it: sometimes even the most diligent battery reconditioning efforts just aren't enough. Batteries have a finite lifespan, and eventually, they'll reach the end of their road. This is usually signaled by a noticeable decrease in battery life, even after following all the tips above.
If your battery is no longer holding a charge like it used to, or if it's constantly swelling or showing signs of damage, it's time for a battery swap. You can often purchase a new battery for your phone model online or at a local phone repair shop.
However, before you jump into a battery replacement, make sure to research reputable sources and be aware of the risks involved. Replacing a battery yourself can be tricky, and if you're not careful, you could damage your phone.
Key Takeaways: Extending the Life of Your Phone Battery
So, remember, you can help your phone battery live a longer, happier life by following these tips:
- Deep discharge and recharge your battery periodically. This helps to recalibrate its performance.
- Avoid extreme temperatures. Heat and cold are bad for your battery.
- Optimize your charging habits. Don't overcharge your phone or let it drain completely.
- Consider a battery calibration app. It might help, but its effectiveness is debated.
- Don't be afraid to replace your battery when it's time. It's the best way to get back that long-lasting power you crave.
With a little care and attention, you can give your phone battery a second life and keep your device running smoothly. Go forth and enjoy those extra hours of battery life!
How to Recondition Old Batteries and Make Them Work Like New

Reconditioning Old Batteries: Restoring Performance and Extending Lifespan
In today's technologically driven world, batteries are ubiquitous, powering everything from smartphones and laptops to electric vehicles and renewable energy systems. While battery technology has advanced significantly, the reality is that batteries eventually degrade and lose their ability to hold a charge effectively. This leads to a decline in performance, shorter runtimes, and ultimately, the need for replacement. However, before discarding your old batteries, it's worth exploring the possibility of reconditioning them to restore their performance and extend their lifespan.
Battery reconditioning is a process that involves rejuvenating the battery cells by reversing the effects of aging and degradation. While not all batteries can be reconditioned successfully, certain types, particularly lead-acid batteries, can benefit from this procedure. This article will delve into the intricacies of battery reconditioning, outlining the methods, benefits, and limitations associated with this approach.
Understanding Battery Degradation
Batteries, like all other components, are subject to wear and tear over time. The primary culprit behind battery degradation is the gradual depletion of active battery material, leading to a reduction in their capacity to store charge. This depletion occurs due to various factors, including:
- Sulfation: In lead-acid batteries, sulfation occurs when lead sulfate crystals build up on the battery plates, hindering the chemical reactions responsible for energy storage.
- Corrosion: Corrosion of the battery plates and terminals can impede the flow of current, reducing battery performance.
- Internal Resistance: Over time, internal resistance within the battery increases, leading to energy loss and decreased charging efficiency.
- Deep Discharge: Repeatedly discharging the battery to a very low level can accelerate the aging process.
- Temperature Extremes: Exposure to extreme temperatures can negatively impact battery chemistry and lifespan.
Reconditioning Methods for Lead-Acid Batteries
Lead-acid batteries, commonly used in vehicles and other applications, are the most likely candidates for reconditioning. Several methods can be employed to rejuvenate these batteries, each with its own advantages and disadvantages:
Desulfation Techniques
Desulfation techniques aim to break down the lead sulfate crystals that accumulate on the battery plates, restoring the battery's ability to store charge effectively. Some common methods include:
- Pulse Charging: This technique involves applying short bursts of high current to the battery, which can help to dislodge the sulfate crystals.
- Equalization Charging: This method involves charging the battery at a higher voltage than normal for an extended period, which can also break down sulfate crystals.
- Desulfation Solutions: Certain commercially available solutions claim to dissolve sulfate crystals and restore battery performance. However, their effectiveness can vary.
Other Reconditioning Techniques
In addition to desulfation, other techniques may be used to recondition lead-acid batteries:
- Battery Cleaning: Cleaning the battery terminals and connections can improve electrical conductivity and reduce internal resistance.
- Electrolyte Top-up: Adding distilled water to electrolyte levels can compensate for water loss and improve battery performance.
- Replacement of Components: In some cases, replacing worn-out components like battery plates or connectors can restore battery functionality.
Benefits of Reconditioning Batteries
Reconditioning old batteries offers several potential benefits, including:
- Cost Savings: Reconditioning can significantly reduce the cost of replacing batteries, as it allows you to extend the lifespan of your existing ones.
- Environmental Sustainability: By reconditioning batteries instead of discarding them, you contribute to a more sustainable approach to waste management.
- Improved Performance: Reconditioned batteries can often regain a significant portion of their original performance, providing you with longer runtimes and better functionality.
Limitations of Battery Reconditioning
While reconditioning can be beneficial, it's important to acknowledge its limitations:
- Not All Batteries Can Be Reconditioned: Reconditioning is most effective for lead-acid batteries, and even then, success is not guaranteed for all batteries. The age, condition, and type of battery all play a role.
- Limited Lifespan Extension: While reconditioning can extend a battery's life, it's unlikely to restore it to its original lifespan. You can expect a modest extension of the battery's usable life.
- Potential Risks: Improper reconditioning techniques can damage the battery or even pose safety hazards. It's crucial to follow the correct procedures and use appropriate safety precautions.
- Long Process: Reconditioning can be a time-consuming process, often requiring several hours or even days to complete.
Safety Precautions for Battery Reconditioning
Battery reconditioning involves working with electricity and potentially hazardous chemicals. It's essential to prioritize safety during this process:
- Wear Protective Gear: Always wear safety goggles, gloves, and protective clothing to avoid contact with battery acid or other potentially harmful substances.
- Work in a Well-Ventilated Area: Battery reconditioning can release fumes, so ensure you work in a well-ventilated area to minimize exposure.
- Avoid Contact with Battery Acid: Never touch the battery acid or electrolyte with bare hands. Use insulated tools and protective gear.
- Disconnect Battery Terminals: Always disconnect the battery terminals from the load before reconditioning to avoid electrical hazards.
- Follow Manufacturer's Instructions: Consult the battery manufacturer's instructions and safety guidelines for specific reconditioning procedures.
Conclusion: Balancing Benefits and Limitations
Reconditioning old batteries can be a viable option to extend their lifespan and reduce waste. However, it's essential to understand the limitations of this process and carefully consider the potential risks involved. By following the right techniques and prioritizing safety, you can potentially restore some of your old batteries to a usable state, saving money and reducing environmental impact.
Ultimately, the decision to recondition a battery depends on your specific needs, the battery's condition, and your willingness to invest time and effort. While reconditioning may not always be the most cost-effective or convenient option, it can provide a valuable second life for some batteries, contributing to a more sustainable and efficient use of resources.
How to Fix a Damaged Battery Cell and Restore Full Power

How to Fix a Damaged Battery Cell and Restore Full Power
Battery cells are essential components in various electronic devices, providing the power to operate them. Over time, these cells can degrade and suffer damage, leading to reduced performance and a shortened lifespan. While replacing a damaged battery cell is often the most practical solution, there are instances where you might consider repairing it to restore its full power and extend its service life. This article will delve into the complexities of battery cell repair and explore the potential methods to address damage and restore functionality.
Understanding Battery Cell Damage and Degradation
Before embarking on any repair attempt, it's crucial to understand the different types of damage that can affect battery cells. Common causes include:
Physical Damage:
- Physical impact: Dropping or mishandling a device can cause dents, cracks, or punctures in the battery cell, compromising its structural integrity.
- Corrosion: Exposure to moisture or corrosive substances can lead to the formation of corrosion on the battery cell's terminals or internal components, hindering electrical conductivity.
- Overheating: Excessive heat, especially during charging or operation, can damage the battery cell's internal components, reducing its capacity and lifespan.
Chemical Degradation:
- Electrolyte depletion: The electrolyte, a key component in the chemical reaction within the battery cell, can degrade over time, reducing the cell's capacity to store and release energy.
- Lithium plating: In lithium-ion batteries, lithium metal can deposit on the anode during charging, hindering the cell's performance and potentially causing internal shorts.
- Formation of dendrites: These small, needle-like structures can grow within the electrolyte, bridging the anode and cathode, causing internal shorts and compromising the battery cell's safety.
Repairing Damaged Battery Cells: A Practical Guide
Repairing a damaged battery cell is a complex and potentially dangerous process. While some minor issues can be addressed, severe damage often necessitates replacement. Here are some methods that might be employed for specific types of damage:
Addressing Physical Damage:
- Surface cleaning: For minor corrosion on the terminals or the external surface, cleaning with a soft cloth and a mild solvent (like isopropyl alcohol) can help restore conductivity.
- Re-soldering connections: If the battery cell's internal connections have been damaged, re-soldering them can restore electrical continuity, but this requires technical expertise and specialized tools.
- Replacing damaged components: In cases of physical punctures or cracks, replacing the damaged component may be necessary. However, this is a highly technical procedure that should only be undertaken by professionals.
Addressing Chemical Degradation:
- Cycling: Repeatedly charging and discharging the battery cell can sometimes help restore some of its capacity by promoting the movement of lithium ions within the cell. However, this method is not always effective and can further damage the cell if not performed carefully.
- Electrolyte replenishment: In some cases, the electrolyte within the battery cell can be replenished with a specialized solution, but this is a highly specialized and potentially hazardous procedure that should only be attempted by qualified professionals.
- Lithium plating removal: Removing lithium plating from the anode can be achieved using specialized techniques, such as pulse charging or chemical treatments. These methods are complex and require advanced knowledge and equipment.
Factors to Consider Before Attempting Repair
Before embarking on any repair attempt, consider the following factors:
- Severity of the damage: Minor physical damage or slight chemical degradation may be repairable, but severe damage, like a deep puncture or internal short circuit, typically necessitates replacement.
- Battery type: Different battery cell chemistries (e.g., lithium-ion, lead-acid) have varying characteristics and require specialized repair methods. Consulting with a qualified professional is essential to ensure the correct repair approach.
- Safety risks: Battery cell repair can be hazardous, particularly when working with lithium-ion cells. These cells can release flammable gases and pose risks of explosion if handled incorrectly.
- Cost-effectiveness: Repairing a damaged battery cell can be expensive, and the effort and resources required may not be justified, especially if the cell is old or its performance is significantly compromised.
Alternatives to Repairing Damaged Cells
In many cases, repairing a damaged battery cell is not feasible or cost-effective. Alternative options to consider include:
- Replacement: Replacing a damaged battery cell with a new one is often the most practical and reliable solution. This ensures optimal performance and safety.
- Battery recycling: Instead of attempting a repair, consider recycling the damaged battery cell responsibly. This minimizes environmental impact and prevents potential hazards associated with improper disposal.
Safety Precautions During Battery Cell Repair
If you are considering repairing a damaged battery cell, prioritize safety above all else. Follow these precautions:
- Work in a well-ventilated area: Ensure adequate ventilation to prevent the accumulation of flammable gases that may be released during repair.
- Use appropriate protective gear: Wear safety glasses, gloves, and a respirator to minimize exposure to potential hazards.
- Avoid contact with electrolyte: Electrolyte is corrosive and can cause skin burns. Handle it with extreme caution and avoid direct contact.
- Avoid piercing or puncturing the cell: Puncturing a battery cell can release flammable gases and create a risk of fire or explosion.
- Do not attempt repairs beyond your expertise: If you lack the necessary knowledge and experience, do not attempt to repair a battery cell. Seek professional assistance to ensure safe and effective repair.
Conclusion
Repairing a damaged battery cell can be a challenging and potentially hazardous endeavor. While some minor issues can be addressed, severe damage often necessitates replacement. Prioritize safety, consider the cost-effectiveness of repair, and consult with qualified professionals when necessary. Remember that responsible battery management, including proper charging practices and avoidance of extreme temperatures, can significantly extend the lifespan of your battery cells and minimize the need for repairs.
How to Recondition NiCad Batteries and Bring Them Back to Life

Reviving Your Old NiCad Batteries: A Guide to Reconditioning
Remember those old NiCad batteries? The ones that powered your toys, tools, and gadgets back in the day? While they might seem like relics of the past, you might be surprised to know they still have life in them! With a little TLC, you can recondition these NiCad batteries and bring them back to their former glory. Let's dive into the world of NiCad battery reconditioning and explore how to give them a second chance.
Understanding NiCad Batteries
NiCad batteries, short for Nickel-Cadmium batteries, were once the go-to power source for many devices. They were known for their durability and ability to withstand numerous charge cycles. However, they also have a tendency to develop a phenomenon called the "memory effect," where they lose capacity over time if they're consistently charged before being fully discharged.
This memory effect is what often leads people to believe their NiCad batteries are dead. But don't worry, it's not always the end of the line! Reconditioning can help to reverse this memory effect and restore the battery's capacity.
The Reconditioning Process
Reconditioning NiCad batteries involves a series of steps designed to break the memory effect and rejuvenate the battery's performance. It's like giving the battery a deep clean and a good workout to get it back in shape.
Step 1: Deep Discharge
The first step is to completely discharge the battery. This is crucial to breaking the memory effect. Here's how to do it:
- Connect the battery to a device that will draw a continuous current until it's completely discharged.
- Use a device with a high power draw, such as a drill, toy car, or even a light bulb, to ensure a quick discharge.
- Monitor the battery's voltage as it discharges. Once it reaches a low voltage, typically around 0.8 volts per cell, disconnect it.
Step 2: Resting Period
After the deep discharge, give the battery a rest. This allows the battery to stabilize and ensures that all the charge is removed. A few hours of rest is usually sufficient.
Step 3: Charging
Now, it's time to charge the battery. Use a NiCad-specific charger for optimal results. Follow these steps:
- Connect the battery to the charger and set the charger to the appropriate voltage and current for your battery.
- Charge the battery until it's fully charged. This may take several hours, depending on the battery's capacity and the charger's current.
- Once the charging process is complete, allow the battery to cool down before using it.
Step 4: Repetition
For best results, repeat the deep discharge, resting, and charging cycle a few times. This helps to further break the memory effect and optimize the battery's performance. It's like giving the battery a series of workouts to strengthen its capacity.
Tips for Success
Here are a few extra tips to help you get the most out of your NiCad reconditioning efforts:
- Use a Dedicated NiCad Charger: Using the right charger is crucial. NiCad chargers have different charging characteristics compared to other battery types, so using a compatible charger is essential.
- Don't Overcharge: Overcharging NiCad batteries can damage them. Always follow the charger's instructions and disconnect the battery once it's fully charged.
- Monitor the Battery Temperature: NiCad batteries generate heat during charging and discharging. Keep an eye on the battery's temperature to ensure it doesn't overheat.
- Avoid Extreme Temperatures: Store your NiCad batteries in a cool, dry place. Extreme temperatures can negatively affect their performance and lifespan.
- Practice Regular Maintenance: Reconditioning your NiCad batteries periodically can help to maintain their capacity and extend their lifespan. Aim to recondition them every few months or whenever you notice a decline in performance.
Safety Precautions
While reconditioning NiCad batteries can be beneficial, safety is paramount. Here are some essential precautions to take:
- Never Attempt to Recondition Damaged Batteries: If the battery is leaking, bulging, or showing signs of damage, do not attempt to recondition it. Dispose of it safely.
- Use Proper Protective Gear: When handling batteries, especially during reconditioning, wear appropriate protective gear like gloves and eye protection to prevent contact with potential leaks or corrosive materials.
- Work in a Well-Ventilated Area: NiCad batteries can release harmful gases during reconditioning. Always work in a well-ventilated area to avoid inhaling these gases.
- Avoid Contact with Skin: NiCad batteries contain corrosive materials. Avoid direct contact with the battery's terminals or any spilled liquids.
- Store Batteries Properly: When not in use, store NiCad batteries separately and away from other metal objects to prevent accidental short circuits.
Alternatives to Reconditioning
While reconditioning can be a helpful way to extend the life of your NiCad batteries, it's not always the most practical solution. Consider these alternatives:
- Replace with New Batteries: If your NiCad batteries are beyond repair or too old, replacing them with new batteries might be the best option. Modern battery technologies like lithium-ion batteries offer higher capacity, longer lifespans, and less memory effect.
- Upgrade to Different Technology: Instead of reconditioning your NiCad batteries, consider upgrading to a different type of battery altogether. Lithium-ion batteries are a popular choice due to their superior performance and longevity.
- Recycle Your Batteries: If you choose to dispose of your NiCad batteries, ensure you do so responsibly. Check with your local recycling center or electronics retailer for proper disposal instructions.
Conclusion
Reconditioning NiCad batteries can be a rewarding experience, giving your old power sources a new lease on life. By following the steps outlined in this guide, you can extend the life of your NiCad batteries and save yourself some money. Remember to prioritize safety and use caution when working with batteries. And if you find your NiCad batteries are beyond repair, consider upgrading to a newer battery technology for better performance and longevity.
How to Recondition and Extend the Life of Your Lead-Acid Battery
Giving Your Lead-Acid Battery a Second Life: A Guide to Reconditioning and Extension
Lead-acid batteries are workhorses, powering everything from cars to motorcycles to backup systems. But like all good things, they eventually wear down. That doesn't mean you have to toss them out just yet! With a little know-how and care, you can often give your trusty lead-acid battery a second lease on life. Let's dive into the world of reconditioning and learn how to extend the life of your battery.
Understanding the Basics
Before we get into the nitty-gritty, let's quickly review how lead-acid batteries work. These batteries store energy through a chemical reaction involving lead plates immersed in an electrolyte solution of sulfuric acid and water. As the battery discharges, the lead sulfate crystals build up on the plates, hindering the flow of electricity. The reconditioning process aims to reverse this buildup and restore the battery's capacity.
Signs Your Battery Needs Help
Your trusty battery might be giving you subtle hints that it's getting tired. Here are some common signs to watch for:
- Slow cranking or difficulty starting your engine
- Dim headlights or other electrical accessories
- Battery fluid level is low
- Battery is physically swollen or leaking
- Frequent charging is required
- The battery terminals are corroded
If you notice any of these symptoms, it's a good idea to investigate further.
Reconditioning Your Lead-Acid Battery
Reconditioning a battery is a bit like giving it a deep clean. The goal is to break down the lead sulfate crystals and restore the battery's chemical balance. This process can be done through several methods, but it's important to remember that not all batteries are created equal.
Here are some common techniques:
1. Desulfation with a Battery Charger
This method involves using a specialized battery charger designed for desulfation. These chargers typically apply a high-frequency pulse to the battery, which can help break down the lead sulfate crystals. This is often considered the easiest and safest method for reconditioning.
2. The "Equalization Charge" Method
This method involves applying a high current charge to the battery for a longer period, typically for several hours. It works by forcing the battery to accept more charge than it normally would, potentially breaking down some of the sulfate buildup. However, this method requires careful monitoring and can be risky if done improperly.
3. Battery Cleaning and "Boiling"
This method involves physically cleaning the battery terminals and removing any corrosion. You can then "boil" the battery by charging it at a high current for a prolonged period, causing the electrolyte to heat up. However, this method is considered quite risky as it can damage the battery if not performed carefully.
Extending Your Battery's Life
Reconditioning can breathe new life into your battery, but it's not a permanent fix. To truly extend its lifespan, you need to practice good battery maintenance habits.
1. Keep It Clean
Dirt and grime can build up on the battery terminals, leading to corrosion and poor electrical connection. Regularly clean the terminals with a wire brush and baking soda solution. Be sure to disconnect the battery before cleaning!
2. Check the Fluid Level
Most lead-acid batteries are designed to be "topped off" with distilled water as they lose fluid through evaporation. Check the level regularly and add distilled water if needed. Be careful not to overfill, as this can damage the battery.
3. Charge Properly
Charging your battery correctly is crucial. Avoid using the "trickle charge" setting on your charger for long periods, as it can overcharge the battery and damage the plates. Use a battery charger designed for your specific type of battery and follow the manufacturer's instructions carefully.
4. Store Properly
If you're not using the battery regularly, store it in a cool, dry place. Avoid storing it in extreme temperatures or direct sunlight. For long-term storage, charge the battery fully every few months to prevent sulfation.
Important Safety Considerations
Working with lead-acid batteries can be dangerous, especially if you're not familiar with the process. Here are some important safety tips:
- Always disconnect the battery from any electrical source before working on it.
- Wear safety goggles and gloves to protect your eyes and hands from the corrosive electrolyte.
- Work in a well-ventilated area, as the fumes from lead-acid batteries can be harmful.
- Avoid spilling electrolyte on your skin or clothing.
- If you're unsure about any part of the reconditioning process, consult a professional.
Is It Worth It?
The decision to recondition a lead-acid battery is a personal one. If you're on a budget and your battery is showing signs of age, reconditioning might be worth a try. However, it's important to understand that reconditioning doesn't always guarantee success. If the battery is severely damaged or beyond its useful life, it might be more economical to replace it.
Before you dive in, it's always a good idea to weigh the pros and cons and do your research. There are many helpful online resources and forums where you can get more information and connect with fellow battery enthusiasts.
How to Recondition a Battery Without Special Tools or Equipment

How to Recondition a Battery Without Special Tools or Equipment
Hey there, car enthusiast! Ever felt the frustration of a sluggish battery that just won't hold a charge? You're not alone! Many of us have been in this predicament, and the thought of shelling out money for a new battery can be a real bummer. But fear not, my friend! There's hope for your tired battery, and you don't need a fancy workshop or specialized tools to give it a second life.
Now, before we dive in, let's be clear: this isn't a magic trick. Reconditioning a battery is a bit like giving a tired old engine a tune-up. It can extend its lifespan and improve its performance, but it won't turn it into a brand-new powerhouse. If your battery is completely shot, it's time to say goodbye and get a new one. But if it's just starting to show its age, reconditioning might be your ticket to a few more years of service.
Understanding the Basics: What Makes a Battery Tick?
Let's break down the anatomy of a battery. It's basically a chemical factory that stores energy in the form of lead plates immersed in a sulfuric acid solution. When you connect the battery to a circuit, a chemical reaction occurs, releasing electrons and producing electricity. This process works great until the lead plates get covered in lead sulfate, which acts like a roadblock, preventing the flow of electrons. That's when you start experiencing the dreaded low battery symptoms!
The Reconditioning Process: A Step-by-Step Guide
Here's how you can try to bring your battery back to life:
Step 1: Safety First!
Batteries store a hefty amount of energy, and sulfuric acid can be dangerous. So, before you start tinkering, make sure you're wearing safety goggles and rubber gloves to protect yourself from accidental splashes. And please, work in a well-ventilated area to avoid inhaling the fumes from the battery.
Step 2: Inspect and Clean
Start by giving your battery a thorough inspection. Look for any cracks or damage to the case. If you see any, it's best to replace the battery as it could be a safety hazard. Next, clean the battery terminals with a wire brush or sandpaper to remove any corrosion. This will ensure a good electrical connection.
Step 3: The Desulfation Process
This is where we tackle the lead sulfate build-up. There are a few methods you can try, but the most common is the "baking soda method."
- Gather your supplies: You'll need baking soda, water, a container, a pair of jumper cables, and a battery charger.
- Prepare the desulfation solution: Mix a few tablespoons of baking soda with water in a container. It should form a thick paste, not a runny solution.
- Apply the paste: Spread the paste evenly over the battery terminals and the top of the battery case, ensuring to cover any visible corrosion.
- Let it sit: Leave the paste in place for 12-24 hours. During this time, the baking soda will react with the lead sulfate, breaking it down and allowing the battery to regain its capacity.
Step 4: Charge It Up!
After the desulfation process, your battery needs a good charging session. Using a regular battery charger, set it to a low charging rate (around 2-3 amps) and charge the battery for 12-24 hours. This will help to fully restore the battery's charge.
Step 5: Test and Assess
Once the battery is fully charged, it's time to see if your reconditioning efforts have paid off! You can use a battery tester to measure the battery's voltage and cranking amps. If the results are good, you're in business!
Tips for Success: Maximizing Your Battery's Life
Okay, so your battery is back in action! But you want to make sure it stays that way. Here are a few tips to prolong its life:
- Regular Maintenance: Clean the terminals periodically to prevent corrosion build-up.
- Avoid Deep Discharges: Try not to let the battery completely drain, as this can damage the lead plates.
- Store It Properly: If you're not using the battery for a while, store it in a cool, dry place.
- Consider a Battery Maintainer: These devices are great for keeping the battery topped off, especially if you don't drive your car frequently.
Final Thoughts: When to Say Goodbye
Remember, reconditioning a battery is a bit of a gamble. It might work, but it might not. If your battery is very old or has experienced multiple deep discharges, it's unlikely to regain its full capacity. In that case, it's best to accept defeat and get a new battery.
However, if you're willing to give it a shot and your battery shows some signs of life, then these methods are definitely worth trying. It's a cheaper alternative to buying a new battery and can save you some dough. Just remember to prioritize safety and use caution while working with batteries!
The Science Behind Reconditioning Lead-Acid Batteries: A Simple Guide

The Science Behind Reconditioning Lead-Acid Batteries: A Simple Guide
Lead-acid batteries, the workhorses of many vehicles and power systems, have a finite lifespan. Over time, the chemical reactions within these batteries degrade, leading to reduced capacity and performance. However, all is not lost! Reconditioning can breathe new life into these aging powerhouses, offering a cost-effective alternative to replacement. Let's delve into the science behind this process and understand how it works.
Understanding Lead-Acid Battery Chemistry
Lead-acid batteries function through a chemical reaction involving lead plates immersed in an electrolyte solution of sulfuric acid and water. During discharge, lead sulfate forms on both plates, reducing the battery's ability to store energy. Reconditioning aims to reverse this process, essentially "cleaning" the plates and restoring their capacity.
The Reconditioning Process
Reconditioning involves a series of steps designed to rejuvenate the battery. Here's a breakdown of the key steps:
1. Desulfation
The primary goal of reconditioning is to remove the lead sulfate buildup on the battery plates. This is achieved through a process called desulfation. Desulfation involves applying a controlled electrical current to the battery, reversing the chemical reaction that formed the lead sulfate. This breaks down the lead sulfate back into lead and sulfuric acid, restoring the battery's chemical balance.
2. Equalization Charge
After desulfation, an equalization charge is applied. This is a long, slow charge at a higher voltage than the standard charging voltage. The equalization charge helps to ensure that all the battery cells reach a full state of charge, eliminating any potential imbalances that might have developed during the discharge cycle.
3. Capacity Testing
Once the reconditioning process is complete, the battery's capacity is tested to assess its performance. This involves discharging the battery under controlled conditions and measuring the amount of energy it can deliver. The capacity test reveals the battery's health and how much it can deliver after reconditioning.
Benefits of Reconditioning
Reconditioning offers several advantages, making it a viable option for extending battery life:
- Cost-Effectiveness: Reconditioning is typically much cheaper than replacing a battery.
- Extended Battery Life: Reconditioning can significantly extend the lifespan of a lead-acid battery, allowing you to get more use out of it.
- Reduced Environmental Impact: Reconditioning reduces the need to manufacture new batteries, minimizing the environmental impact associated with battery production.
Considerations for Reconditioning
While reconditioning can be effective, it's essential to understand its limitations and potential drawbacks:
- Not a Cure-All: Reconditioning cannot fix all battery problems. Severe damage, such as physical damage to the plates, can render reconditioning ineffective.
- Potential for Damage: Improper reconditioning techniques can damage the battery, leading to decreased performance or even premature failure.
- Limited Success: While reconditioning can often revive a battery, it's not always successful, particularly for batteries that have been deeply discharged or severely neglected.
Conclusion
Reconditioning lead-acid batteries can be a valuable tool for extending their lifespan and saving money. Understanding the science behind this process and taking necessary precautions can help you make informed decisions about whether reconditioning is right for your battery. Always consult with a qualified professional to ensure proper reconditioning techniques and maximize the chances of success.
How to Safely Fix Lead-Acid Batteries Without Risk of Overcharging

Safely Fixing Lead-Acid Batteries: Avoiding the Perils of Overcharging
Lead-acid batteries, the ubiquitous power source for vehicles, motorcycles, and various other applications, are known for their durability and reliability. However, these batteries, like any other electrochemical storage device, are susceptible to damage and require proper maintenance to ensure optimal performance and longevity. One of the primary concerns when dealing with lead-acid batteries is the risk of overcharging. Overcharging can lead to severe damage, compromising the battery's capacity and lifespan, and potentially creating hazardous situations. This article provides a comprehensive guide on safely fixing lead-acid batteries while effectively mitigating the risks associated with overcharging.
Understanding the Risks of Overcharging
Overcharging occurs when a battery is subjected to an excessive charging current or voltage for an extended period. This prolonged exposure to high electrical stress can result in detrimental effects:
Electrolyte Degradation and Water Loss
During charging, water molecules in the electrolyte solution decompose, producing hydrogen and oxygen gas. Overcharging exacerbates this process, leading to excessive water loss, known as "gassing." As the electrolyte becomes more concentrated, its conductivity decreases, hindering the charging process and reducing battery capacity.
Plate Sulfation and Corrosion
High charging voltages cause lead sulfate crystals to form on the battery plates, hindering the chemical reactions involved in charge storage and discharge. This sulfation, if unchecked, can permanently damage the battery plates, reducing their ability to hold a charge. Additionally, prolonged overcharging can lead to corrosion of the battery's internal components, further degrading its performance.
Heat Generation and Thermal Runaway
Overcharging generates excessive heat within the battery. While some heat is normal during the charging process, prolonged overcharging can lead to a dangerous temperature rise. This heat can accelerate electrolyte decomposition, exacerbate sulfation, and potentially trigger a thermal runaway scenario, where the battery heats up uncontrollably, posing a fire hazard.
Identifying Overcharging Issues
Recognizing signs of overcharging is crucial for preventing further damage. Here are some common indicators:
Safe Battery Charging Practices
Proper charging practices are paramount for extending battery life and preventing overcharging-related damage. Here are some key guidelines:
Use a Battery Charger Specifically Designed for Lead-Acid Batteries
A dedicated lead-acid battery charger provides controlled charging parameters, ensuring the battery receives the optimal current and voltage for its specific type and capacity.
Follow the Manufacturer's Charging Recommendations
Each battery model comes with specific charging guidelines in its manual. Adhering to these recommendations ensures safe and efficient charging.
Monitor the Charging Process
Regularly check the battery's temperature, voltage, and charging current during the charging process. This allows you to identify any unusual behavior and adjust the charging parameters as needed.
Utilize a Battery Analyzer
A battery analyzer can accurately assess the battery's state of charge, specific gravity, and internal resistance, providing valuable insights into its health and charging needs.
Avoid Overcharging by Limiting Charging Time
Once a battery reaches full charge, it's crucial to disconnect the charger to prevent overcharging. Most chargers incorporate automatic shut-off mechanisms to prevent overcharging.
Fixing Overcharged Lead-Acid Batteries
If you suspect your battery has been overcharged, take immediate action to mitigate the damage and restore its functionality. Here are some strategies:
Disconnect the Battery from the Charging Source
The first and most important step is to disconnect the battery from the charger. This halts the overcharging process and minimizes further damage.
Check for Physical Damage
Inspect the battery for any signs of bulging, leaking, or other physical damage. If any damage is present, it's recommended to replace the battery as it may pose a safety hazard.
Hydrate the Battery (If Applicable)
In the case of vented lead-acid batteries, if the electrolyte level has dropped due to gassing, adding distilled water can replenish the electrolyte. Consult the battery manual for specific instructions.
Perform a Deep Cycle Discharge
Connecting the battery to a load and allowing it to discharge completely can help to desulfate the plates. However, this should be done carefully and monitored closely, as over-discharging can also damage the battery.
Use a Battery Desulfator
Desulfators employ specialized electrical pulses to break down sulfation deposits on the battery plates. While not always effective, desulfators can potentially restore some of the battery's capacity.
Seek Professional Assistance
If you are unsure about the extent of the damage or lack the necessary equipment to address the overcharging issue, it's highly recommended to consult a qualified automotive technician or battery specialist. They can diagnose the problem, recommend appropriate solutions, and ensure safe handling.
Preventative Measures for Battery Longevity
Proactive measures can go a long way in preventing overcharging and extending battery lifespan.
Conclusion
Lead-acid batteries are essential components in various applications, and their proper maintenance is crucial. Understanding the risks of overcharging and implementing safe charging practices are paramount for maximizing battery lifespan and preventing potential hazards. By following the guidelines outlined in this article, you can safely fix overcharged lead-acid batteries, extend their operational life, and ensure a reliable power source for your needs. Remember, when in doubt, consult a professional for assistance.
Tuesday, January 28, 2025
How to Recondition Dead Lead-Acid Batteries for Better Performance

Reconditioning Dead Lead-Acid Batteries for Enhanced Performance
Lead-acid batteries are ubiquitous in various applications, powering everything from vehicles to emergency power systems. However, over time, these batteries degrade, losing their capacity and eventually becoming "dead." While replacing a dead battery is often the quickest solution, reconditioning them can be a cost-effective alternative, breathing new life into these valuable assets.
This article delves into the intricacies of reconditioning dead lead-acid batteries, exploring the underlying principles, techniques, and considerations involved in restoring their performance. By understanding the process, you can potentially extend the lifespan of your batteries and save on replacement costs.
Understanding the Degradation Process
Before delving into the reconditioning process, it's crucial to understand why lead-acid batteries degrade. This knowledge provides a foundation for understanding the underlying mechanisms that need to be addressed during reconditioning.
Sulfation
Sulfation is the primary culprit behind battery degradation. As the battery discharges, lead sulfate crystals form on the lead plates. While this is a normal process, over time, these crystals can become larger and harder, hindering the flow of electrical current. This phenomenon, known as sulfation, is exacerbated by frequent partial discharges, prolonged periods of inactivity, and extreme temperatures.
Corrosion and Plate Expansion
Over time, corrosion can occur on the lead plates, leading to a decrease in their surface area. This corrosion, along with the expansion of the plates due to sulfation, can lead to a decrease in the battery's capacity and internal resistance.
Loss of Electrolyte
The electrolyte, a solution of sulfuric acid, can gradually evaporate or decompose over time. This loss of electrolyte reduces the battery's ability to conduct electricity.
Reconditioning Techniques
Reconditioning dead lead-acid batteries involves reversing the effects of degradation, primarily sulfation, through a combination of techniques. Here are some common methods employed:
Desulfation Using a Battery Charger
This method involves using a specialized battery charger designed for desulfation. These chargers typically employ pulse charging techniques, delivering high-frequency pulses of current to break down the lead sulfate crystals. The process involves the following steps:
- Initial Cleaning: Clean the battery terminals and surrounding area with a baking soda solution to remove corrosion.
- Charging: Connect the desulfation charger to the battery and follow the manufacturer's instructions.
- Pulse Charging: The charger will apply a series of high-frequency pulses of current, aiming to break down the sulfation on the lead plates.
- Monitoring: Monitor the charging process and battery voltage. The charger may have indicators or a display to indicate the desulfation progress.
- Final Charge: After the desulfation cycle, a final charge may be necessary to bring the battery to its full capacity.
Note that desulfation chargers come in different types and configurations, and it's essential to choose a model compatible with your battery type and size. Additionally, the charging time can vary depending on the battery's condition and the charger's capabilities.
Electrolyte Addition and Equalization Charging
If the battery has lost electrolyte, it might be necessary to add distilled water to bring the electrolyte level to the proper level. This must be done carefully to avoid overfilling. After adding water, a process called equalization charging may be used to ensure that all the cells in the battery have a consistent charge. Equalization charging involves applying a constant current for a longer duration, typically 24 hours or more. This process can help to desulfate the battery and ensure that all cells are fully charged.
Battery Equalizer
A battery equalizer is a device that monitors the individual cells of a battery and helps to maintain consistent charging levels. It works by selectively applying a small charge to cells that are lagging behind, ensuring that all cells are at a similar state of charge. This can help to reduce sulfation and prolong battery life.
Precautions and Considerations
While reconditioning can be a viable option, several precautions and considerations are essential:
Safety First
Lead-acid batteries contain sulfuric acid, which can be dangerous if not handled correctly. Wear protective gear such as gloves, eye protection, and appropriate clothing. Work in a well-ventilated area and avoid contact with the battery acid.
Battery Type and Age
The reconditioning process may not be effective for all types of lead-acid batteries. Deep-cycle batteries are generally more resilient to sulfation than starting batteries. Additionally, the age of the battery can influence its ability to be reconditioned. Batteries that are severely aged or have experienced significant damage may be beyond repair.
Battery Condition
Before attempting reconditioning, inspect the battery for physical damage, leakage, or other signs of deterioration. A battery with visible cracks, bulging, or corrosion may not be suitable for reconditioning.
Professional Assistance
If you are unsure about the process or the condition of your battery, it's advisable to consult with a qualified technician or battery specialist.
Conclusion
Reconditioning dead lead-acid batteries can be a cost-effective way to extend their lifespan and reduce the need for replacements. By understanding the underlying degradation processes and the various reconditioning techniques, you can potentially breathe new life into these valuable assets. However, it's crucial to prioritize safety and to carefully evaluate the battery's condition and suitability for reconditioning. If you have doubts, seeking professional advice is always recommended.
Essential Battery Reconditioning Chemicals for Lead-Acid and NiCad Batteries

Essential Battery Reconditioning Chemicals for Lead-Acid and NiCad Batteries
So, you've got a battery that's lost its mojo, huh? Maybe it's a cranky car battery struggling to start your engine, or a tired NiCad battery in your power tool that just won't hold a charge anymore. Don't throw in the towel just yet! There's a good chance you can bring those batteries back to life with a little bit of reconditioning magic.
But before you start tinkering, you'll need to gather the right tools. And that includes some special chemicals designed to work their wonders on your tired batteries. Let's break down the essential chemicals for reconditioning both lead-acid and NiCad batteries.
Lead-Acid Battery Reconditioning Chemicals
Lead-acid batteries, the workhorses of the automotive world and many other applications, can suffer from various ailments like sulfation, corrosion, and reduced electrolyte levels. Here's a rundown of the key chemicals that can help revive them:
Battery Desulfator
Think of battery desulfator as the magic potion for your lead-acid battery. It's a specialized solution that helps break down the sulfate crystals that build up on the battery plates over time. Sulfation acts like a stubborn film, preventing the battery from properly accepting and releasing charge.
Desulfators typically contain special additives that use a combination of chemical and electrical processes to disrupt the sulfate crystals. They can be applied in different ways:
- Liquid desulfators: These solutions are added directly to the battery electrolyte, where they work their magic over time.
- Electronic desulfators: These devices send low-frequency pulses through the battery to break down sulfation.
While desulfators can work wonders, it's important to note that they're not a cure-all. Severe cases of sulfation might not respond to desulfation alone.
Electrolyte Booster
A good electrolyte booster is like a shot of energy for your battery. It adds distilled water to the electrolyte, ensuring it's at the proper level. Low electrolyte levels can lead to premature failure, so keeping it topped up is crucial.
Distilled water is the preferred choice because it lacks impurities that can harm the battery. Tap water, on the other hand, contains minerals that can build up over time and cause corrosion.
Corrosion Remover
Corrosion is another enemy of lead-acid batteries. It can build up on the terminals and connections, hindering the flow of electricity. A dedicated corrosion remover is formulated to break down these corrosive compounds.
These removers often come in spray or liquid forms, making it easy to apply to the affected areas. The key is to remove all traces of corrosion before connecting the battery to prevent further damage.
NiCad Battery Reconditioning Chemicals
NiCad batteries, once the go-to power source for cordless tools and other devices, have lost some of their luster in the age of lithium-ion batteries. However, they still hold a place in certain applications due to their durability and ability to withstand extreme temperatures.
But unlike lead-acid batteries, NiCad reconditioning involves different chemicals and techniques.
Memory Effect Treatment
NiCad batteries are notorious for developing a "memory effect," where they lose their ability to hold a full charge after being repeatedly charged to a partial level. This issue can be addressed with a special "memory effect treatment."
The treatment typically involves fully discharging the battery, then charging it to its full capacity while maintaining a constant temperature. This process helps reset the battery's charge cycle and improve its overall performance.
Electrolyte Cleaning Agent
Over time, NiCad batteries can accumulate impurities in their electrolyte, leading to a reduction in capacity and efficiency. A dedicated electrolyte cleaning agent helps remove these impurities and restore the electrolyte's purity.
These cleaning agents are usually formulated to remove metallic salts, oxides, and other contaminants that build up over time.
Safety First: Always Use Protective Gear
Before you start your reconditioning adventure, remember that battery chemicals can be hazardous. Always wear appropriate safety gear, including gloves, eye protection, and a respirator. Work in a well-ventilated area and keep children and pets away.
Beyond Chemicals: Other Considerations
While chemicals play a vital role in battery reconditioning, they're not the whole story. Here are some additional factors to keep in mind:
- Battery Age: Older batteries are more prone to sulfation and other issues. If your battery is several years old, reconditioning may not be feasible.
- Battery Condition: Batteries with significant physical damage or corrosion may not respond to reconditioning.
- Proper Charging: Ensure you're using the correct charger for your battery type and following the manufacturer's instructions.
- Regular Maintenance: Keeping your battery terminals clean and the electrolyte level topped up can prolong its life.
The Final Verdict: When to Replace Your Battery
Battery reconditioning can be a valuable tool for extending the life of your trusty batteries. However, it's not a magic bullet. If your battery is showing signs of serious deterioration, such as severe sulfation, physical damage, or consistent low capacity, it's probably time to consider a replacement.
By understanding the essential chemicals and following the proper safety procedures, you can embark on your battery reconditioning journey with confidence. So go ahead, give those tired batteries a second chance â€" they might just surprise you!
How to Safely Handle Acid Batteries When Reconditioning Them
Safely Handling Acid Batteries During Reconditioning
Reconditioning lead-acid batteries can be a rewarding process, extending their lifespan and saving you money. However, it's crucial to prioritize safety when dealing with these batteries, as they contain sulfuric acid, a corrosive and potentially hazardous substance. This article will guide you through the essential safety precautions to take when handling acid batteries during the reconditioning process.
Essential Safety Gear
Before you even begin the reconditioning process, ensure you have the right safety gear to protect yourself from potential hazards:
1. Eye Protection:
Always wear safety goggles or a face shield to shield your eyes from acid splashes. Acid burns can cause severe eye damage.
2. Hand Protection:
Wear chemical-resistant gloves made of nitrile or neoprene. Avoid using latex gloves, as they are easily penetrated by acid.
3. Protective Clothing:
Wear an acid-resistant apron and long-sleeved clothing to protect your skin from spills and splashes. Choose clothing made from materials that resist acid penetration.
4. Respiratory Protection:
In poorly ventilated areas or when dealing with large quantities of acid, use a respirator equipped with acid-resistant cartridges. This will protect you from inhaling acid fumes.
Handling Acid Batteries Safely
Now, let's move on to the specific safety practices during reconditioning:
1. Working Area:
Choose a well-ventilated area to work on the batteries, preferably outdoors or in a garage with adequate ventilation. Avoid working in enclosed spaces where fumes can accumulate.
2. Battery Storage:
Store batteries upright to prevent leaks. Place them on a non-corrosive surface, such as a plastic or rubber mat, to protect your work area from acid spills.
3. Handling Batteries:
Lift batteries carefully, using a battery lifter or a strong grip to avoid dropping them. Never attempt to lift batteries by the terminals or any other fragile parts.
4. Cleaning Battery Terminals:
Before cleaning terminals, ensure the battery is disconnected. Use baking soda paste or a commercial battery terminal cleaner to remove corrosion.
5. Acid Addition:
When adding acid to batteries, pour it slowly and carefully to avoid spills. Always add acid to water, never water to acid, as this can cause a dangerous exothermic reaction.
6. Battery Charging:
During charging, ensure the battery is securely connected to the charger. Monitor the charging process and ensure the battery doesn't overheat or bubble excessively.
Handling Acid Spills
In the unfortunate event of an acid spill, follow these steps:
1. Evacuation:
Immediately evacuate the area, ensuring everyone is safe and wearing appropriate protective gear.
2. Neutralization:
Neutralize the spill with baking soda or a commercial acid neutralizer. Avoid using water as it can spread the acid and worsen the situation.
3. Clean-up:
Use a broom and dustpan to collect the neutralized acid and dispose of it properly. Clean the affected area thoroughly with water and baking soda solution.
First Aid for Acid Exposure
If acid comes into contact with your skin or eyes, follow these steps:
1. Skin Exposure:
Immediately flush the affected area with copious amounts of water for at least 15 minutes. Remove contaminated clothing and wash it separately.
2. Eye Exposure:
Hold your eyelids open and flush your eyes with water for at least 15 minutes, making sure to get under the eyelids. Seek immediate medical attention.
3. Inhalation:
Move to a well-ventilated area and get fresh air. If breathing difficulty occurs, seek medical attention.
4. Ingestion:
Do not induce vomiting. Seek immediate medical attention, providing details of the ingested substance.
Conclusion
Reconditioning acid batteries can be a beneficial endeavor, but safety must always be prioritized. By following the outlined safety precautions and taking appropriate actions in case of an accident, you can ensure a safe and successful reconditioning process. Remember, safety should always be your primary concern when working with potentially hazardous materials like sulfuric acid.
How to Recondition a Dead Lead-Acid Battery Using Simple Tools

Reconditioning a Dead Lead-Acid Battery: A Step-by-Step Guide
Reviving a seemingly dead lead-acid battery can be a rewarding endeavor, saving you money and reducing waste. While not guaranteed to work for every battery, this process often breathes new life into batteries that have lost their charge due to sulfation or other common issues. This guide provides a comprehensive step-by-step approach using simple tools readily available in most garages or workshops.
Safety First
Lead-acid batteries contain sulfuric acid, a corrosive substance. Always wear protective gear, including gloves, goggles, and long sleeves, when working with these batteries. Work in a well-ventilated area, as battery charging generates hydrogen gas, which is flammable. Never mix battery acid with other chemicals, and always dispose of it properly.
Assessing the Battery
Before diving in, it's crucial to understand the battery's state. Use a multimeter to check the voltage across the battery terminals. A fully charged lead-acid battery should read around 12.6 volts. A reading below 10 volts indicates a deeply discharged battery, which may be beyond reconditioning. Inspect the battery for any signs of physical damage, such as leaks, cracks, or corrosion.
Signs of a Dead Battery
- Slow cranking or inability to start the engine.
- Dim headlights or other electrical issues.
- The battery is physically bulging or leaking.
Reconditioning Steps
If the battery shows promise, proceed with the reconditioning process. The key is to desulfate the battery plates, which involves breaking down the lead sulfate crystals that build up on the plates and prevent proper charge flow.
1. Cleaning and Preparation
Start by cleaning the battery terminals with a wire brush. Remove any corrosion with a baking soda and water paste. Ensure the battery terminals are free of debris and corrosion before proceeding. If the battery has a vent cap, remove it and inspect the electrolyte level. Top off the electrolyte with distilled water if necessary.
2. Desulfation with a Charger
Now, connect a battery charger to the battery terminals. Use a charger specifically designed for lead-acid batteries, and adjust the charge rate to the battery's specifications. Begin by applying a low charge rate (around 1/10th of the battery's amp-hour rating). This slow charging method helps to gently desulfate the plates without generating excessive heat. Continue charging for 24-48 hours. The battery will likely heat up during this process, which is normal.
3. Pulse Charging
After the initial desulfation charge, you can try pulse charging to further break down the sulfation. Pulse charging involves applying a series of high-current pulses to the battery for short durations. There are specialized battery pulse chargers available on the market, but you can also try a DIY approach using a simple circuit and a DC power supply. However, this method requires advanced electrical knowledge and should be undertaken with caution.
4. Testing and Evaluation
Once the charging is complete, use a multimeter to check the battery's voltage. A fully charged battery should read around 12.6 volts. If the voltage is significantly lower, the battery may be beyond reconditioning. Test the battery in your vehicle to evaluate its performance. If the battery performs well, you have successfully reconditioned it.
Maintenance and Precautions
Even after reconditioning, it's essential to follow proper maintenance practices to prolong the battery's life:
- Keep the battery terminals clean and free of corrosion.
- Avoid excessive discharging, as it can contribute to sulfation.
- Charge the battery regularly to prevent sulfation.
- Store the battery in a cool, dry place when not in use.
Reconditioning a dead lead-acid battery is a worthwhile endeavor, but it's not a guaranteed solution. Some batteries may be too damaged to be revived. If the battery fails to recover after the reconditioning process, it's time to consider replacing it with a new one.
By following these steps and safety precautions, you can increase the chances of successfully reconditioning your dead lead-acid battery, extending its life and saving you money.
How to Recondition NiCad Batteries and Improve Their Capacity

Reconditioning NiCad Batteries: Restoring Capacity and Extending Life
Nickel-cadmium (NiCad) batteries, despite being largely superseded by newer technologies like lithium-ion, still find use in various applications, particularly in power tools, model airplanes, and certain electronics. Over time, NiCad batteries experience a decline in their capacity, leading to shorter runtimes. While they might not be as efficient as their modern counterparts, reconditioning can help restore their performance and extend their lifespan. This article explores the science behind NiCad battery degradation, presents effective reconditioning techniques, and provides practical advice for maintaining these venerable power sources.
Understanding NiCad Battery Degradation
NiCad batteries are comprised of nickel oxide hydroxide (NiOOH) as the cathode and cadmium (Cd) as the anode, immersed in an alkaline electrolyte solution. During discharge, the chemical reaction releases energy, causing the NiOOH to reduce to Ni(OH)2. This process is reversed during charging, restoring the NiOOH. However, over time, the internal resistance of the battery increases, resulting in lower capacity and faster discharge rates. The factors contributing to this degradation include:
Memory Effect:
NiCads suffer from the "memory effect" where frequent partial charging can "train" the battery to only hold the charge level it reached during those previous incomplete cycles. This can lead to a reduction in the overall capacity as the battery becomes accustomed to delivering a smaller amount of energy.
Crystallization of Electrolyte:
Over time, the electrolyte solution can crystallize, hindering the flow of ions and leading to increased internal resistance. This phenomenon is accelerated by high temperatures.
Corrosion and Dendrite Formation:
The metallic components of the battery can corrode over time, particularly at the electrodes. Additionally, metallic dendrites can grow from the anode during charging, leading to internal short circuits and capacity loss.
Techniques for Reconditioning NiCad Batteries
Reconditioning NiCad batteries involves a series of steps aimed at reversing the effects of degradation and restoring their capacity. While these techniques can be effective, they may not always work for severely damaged batteries. It's important to note that reconditioning can be risky and should be performed with caution. Always follow safety procedures and exercise extreme care when working with batteries and electricity.
Deep Discharge and Full Charge Cycle:
This is the most common reconditioning technique. It involves completely discharging the battery, preferably by using it until it's completely drained. Then, charge the battery for an extended period, typically longer than the recommended charging time. This deep discharge and full charge cycle can help break the memory effect and clear the electrolyte solution. However, this method is not suitable for all batteries, and may damage some NiCad batteries, especially if done frequently.
Pulse Charging:
Pulse charging involves delivering a series of short, high-current pulses to the battery. This technique can help to break up any crystallizations in the electrolyte and promote better ion flow. Specialized pulse chargers are available commercially for this purpose. This method is known for its effectiveness but requires specialized equipment.
Temperature Cycling:
This method involves subjecting the battery to alternating high and low temperatures. This temperature cycling can help to break up any crystallizations and improve the conductivity of the electrolyte. This method is time-consuming and requires careful monitoring to prevent overheating or damaging the battery.
Acid Treatment:
In some cases, a weak acid solution can be used to dissolve any metallic dendrites or corrosion buildup on the electrodes. This is a more aggressive technique and should only be attempted by experienced technicians. It's important to use the correct acid concentration and to thoroughly rinse the battery afterward. This method should only be used as a last resort, as it can damage the battery if not performed correctly.
Maintaining NiCad Battery Performance
While reconditioning can help restore some of the lost capacity, proper maintenance practices are essential to prevent further degradation and extend the lifespan of your NiCad batteries.
- Avoid deep discharges: Frequent deep discharges can accelerate battery degradation. Try to top up the battery before it reaches complete discharge.
- Charge regularly: Fully charge the battery after each use. This helps to maintain the electrolyte conductivity and minimize the effects of the memory effect.
- Store in a cool, dry place: Extreme temperatures can accelerate degradation. Store your NiCad batteries in a cool and dry environment.
- Avoid overcharging: Overcharging can damage the battery, leading to heat generation and potential explosions. Follow the manufacturer's charging instructions and use appropriate chargers.
- Use a slow charge rate: Charging at a lower rate can improve the longevity of the battery. Check the battery specifications for recommended charging rates.
- Cycle the battery periodically: Even when not in use, it is beneficial to cycle the battery occasionally by fully charging and discharging it. This helps to maintain the electrolyte's conductivity and prevent crystallization.
Conclusion
Reconditioning NiCad batteries can offer a solution for restoring lost capacity and extending their lifespan. However, it is important to understand the limitations and potential risks involved. While these methods can be effective, they may not always work, and there is always a chance of damaging the battery. Remember that proper maintenance is key to preserving the performance of NiCad batteries. By following the guidelines outlined in this article, you can maximize the longevity of your NiCad batteries and enjoy their continued service for years to come.
It is worth noting that while NiCad batteries have a history of being relatively resilient, they are now considered outdated compared to modern battery chemistries like lithium-ion. If you are considering purchasing new batteries, lithium-ion technology offers significant advantages in terms of capacity, charge times, and memory effect. However, NiCad batteries may still be a suitable option for specific applications, particularly where their ruggedness and low cost are factors.
Ultimately, the decision of whether to recondition or replace your NiCad batteries depends on your individual needs and the specific application. By understanding the principles behind NiCad battery degradation, reconditioning, and maintenance, you can make an informed choice and ensure the optimal performance of your battery systems.
How to Restore Power to a Lead-Acid Battery Using a Low Charge Method

Restoring Power to a Lead-Acid Battery Using a Low Charge Method
Lead-acid batteries are a common and reliable energy storage solution used in various applications, including automobiles, motorcycles, and backup power systems. However, these batteries can lose their charge over time, especially if they are not used frequently. When a lead-acid battery becomes deeply discharged, it can be challenging to restore its power using conventional charging methods. In such cases, a low charge method can be a viable solution for reviving the battery and extending its lifespan.
The low charge method involves applying a very small current to the battery over an extended period, allowing the battery to gradually regain its charge. This method is particularly effective for deeply discharged batteries that have experienced sulfation, a process where lead sulfate crystals form on the battery plates, hindering the flow of current.
Understanding the Low Charge Method
The low charge method is based on the principle of using a very small current to slowly penetrate the sulfation layer and break down the lead sulfate crystals. This process allows the battery to gradually absorb charge and restore its capacity.
Benefits of the Low Charge Method
- Gentle on the Battery: The low current used in this method minimizes the stress on the battery, reducing the risk of damage or overheating.
- Effective for Sulfated Batteries: This method is particularly effective for batteries that have experienced sulfation, as it helps to break down the lead sulfate crystals.
- Increases Battery Lifespan: By restoring the battery's capacity, the low charge method can extend the battery's lifespan.
- Cost-Effective: The low charge method is relatively inexpensive, requiring only a basic charger and a long charging time.
Limitations of the Low Charge Method
- Time-Consuming: This method requires a significant amount of time, typically several days or even weeks, to restore the battery's charge.
- May Not Work for All Batteries: The low charge method may not be effective for batteries that have been severely damaged or have a complete loss of capacity.
- Requires Close Monitoring: Monitoring the battery's voltage and temperature during the charging process is crucial to prevent overcharging or damage.
Steps to Restore Power Using the Low Charge Method
Restoring power to a lead-acid battery using the low charge method requires a specific approach and careful monitoring. The following steps outline the process:
- Prepare the Battery: Ensure the battery is in a clean and well-ventilated area. Disconnect the battery terminals from the load to prevent any potential hazards.
- Check Battery Voltage: Use a voltmeter to check the battery's voltage. If the voltage is below 10.5 volts, the battery is deeply discharged and requires the low charge method.
- Choose a Suitable Charger: Use a low-current charger designed specifically for lead-acid batteries. The charger should have adjustable current settings.
- Set the Charging Current: Set the charger's current output to a low level, typically 1/10th of the battery's amp-hour rating. For example, a 100 amp-hour battery should be charged at 10 amps.
- Start the Charging Process: Connect the charger to the battery terminals, ensuring proper polarity. Begin the charging process at the low current setting.
- Monitor Battery Voltage and Temperature: Regularly check the battery's voltage and temperature. The voltage should gradually increase, while the temperature should remain within a safe range.
- Adjust Charging Current: Once the battery voltage reaches a certain level, typically around 12.5 volts, increase the charging current slightly. Continue adjusting the current as needed, ensuring the voltage does not exceed 14.5 volts.
- Maintain Constant Voltage: Once the battery reaches a fully charged state, typically around 14.4 volts, switch the charger to a constant voltage mode to maintain the charge level.
- Complete the Charging Process: Continue the charging process for several days, or even weeks, until the battery reaches its full capacity. This can vary depending on the battery's age, size, and level of sulfation.
- Check Battery Performance: Once the charging process is complete, check the battery's performance by measuring its voltage and capacity. If the battery does not hold a charge or exhibits poor performance, it may be beyond repair.
Safety Precautions
When working with lead-acid batteries, it is crucial to follow safety precautions to prevent accidents and injuries. These precautions include:
- Wear Protective Gear: Always wear eye protection, gloves, and appropriate clothing when working with batteries.
- Work in a Well-Ventilated Area: Lead-acid batteries release hydrogen gas during charging, which is flammable. Ensure adequate ventilation to prevent gas buildup.
- Avoid Sparks: Avoid creating sparks near the battery, as this could ignite the hydrogen gas.
- Disconnect the Battery Terminals: Disconnect the battery terminals from the load before working on the battery.
- Handle Battery Acid with Care: Battery acid is corrosive. If acid spills on skin or clothing, immediately flush with water and seek medical attention.
Conclusion
The low charge method is a viable approach for reviving deeply discharged lead-acid batteries, especially those affected by sulfation. This method requires patience and careful monitoring, but it can be effective in restoring battery capacity and extending its lifespan. Remember to follow safety precautions and consult a battery specialist if you have any concerns or questions about this process.